114 private links
Step 0.1: If there is a hot cup of coffee waiting to be picked up, kindly pick it up and hand it to its owner.
Step 1: Make sure there is plenty of water.
Step 2: Push the power button to begin the warm up process.
Step 3: Place a Keurig pod in the machine.
Step 4: Choose between pot or single serve from the flashing buttons.
Step 5: Choose the size in ounces from the number options.
Step 6: Push the "Strong" button, otherwise you are just brewing tea.
Step 7: Push the big silver K in middle of the controls.
Step 8: Wait patiently, then enjoy your coffee.
Use OneDrive as a cloud backup to share your files and folders with others. Learn how to control permissions, allow editing, or set expiration dates.
-
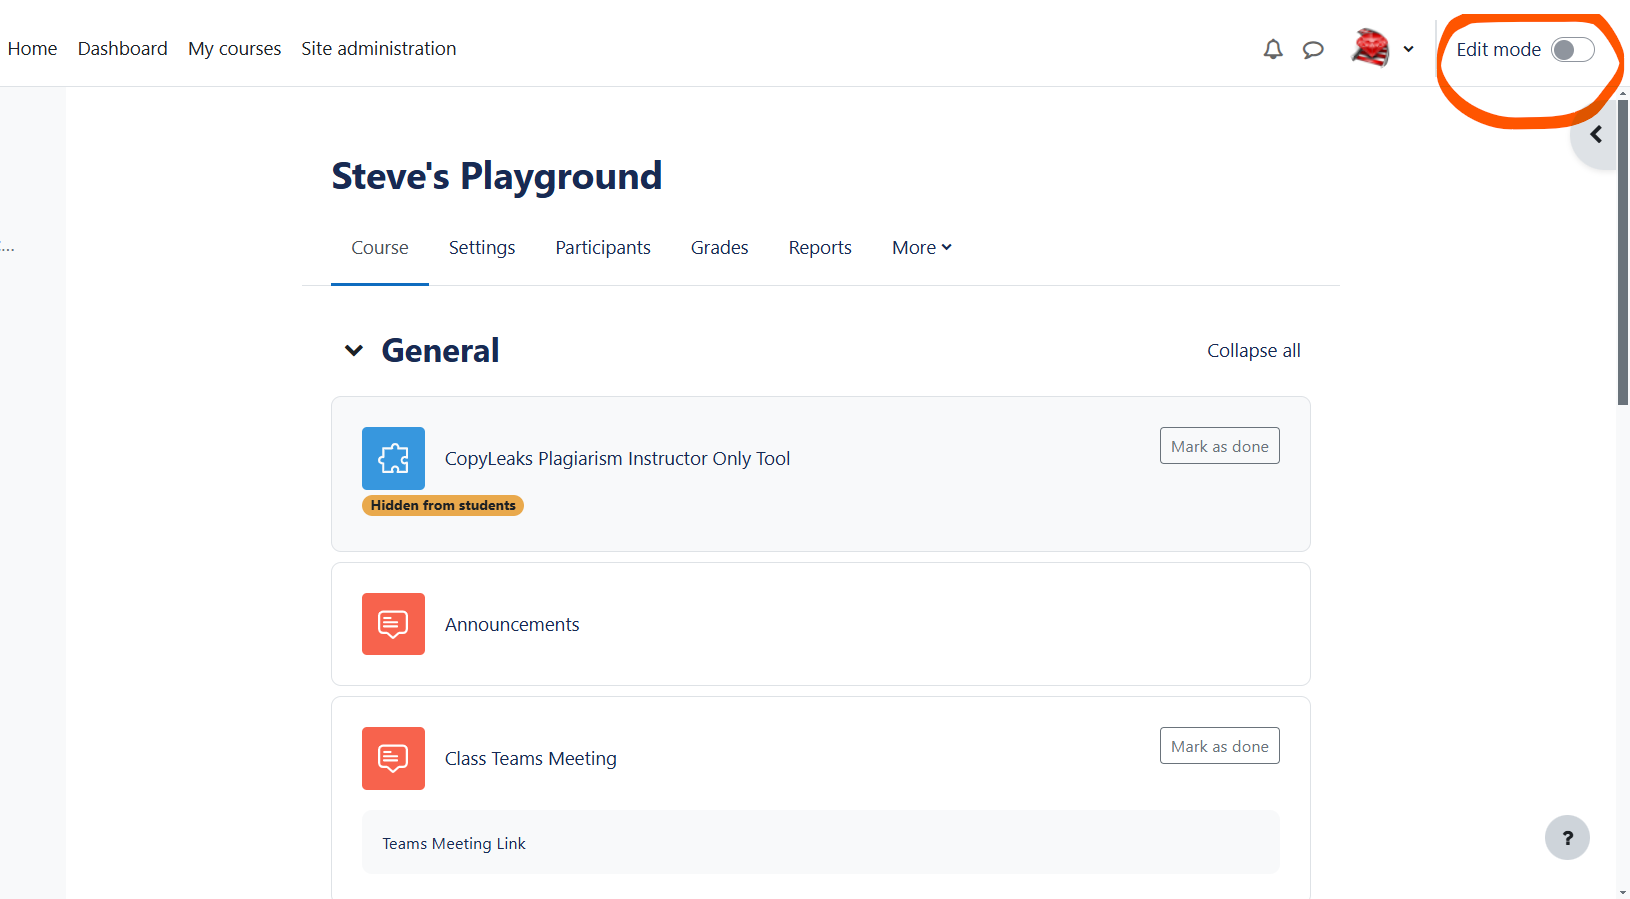
Locate the Edit mode selector in the top right corner and turn it on.
-
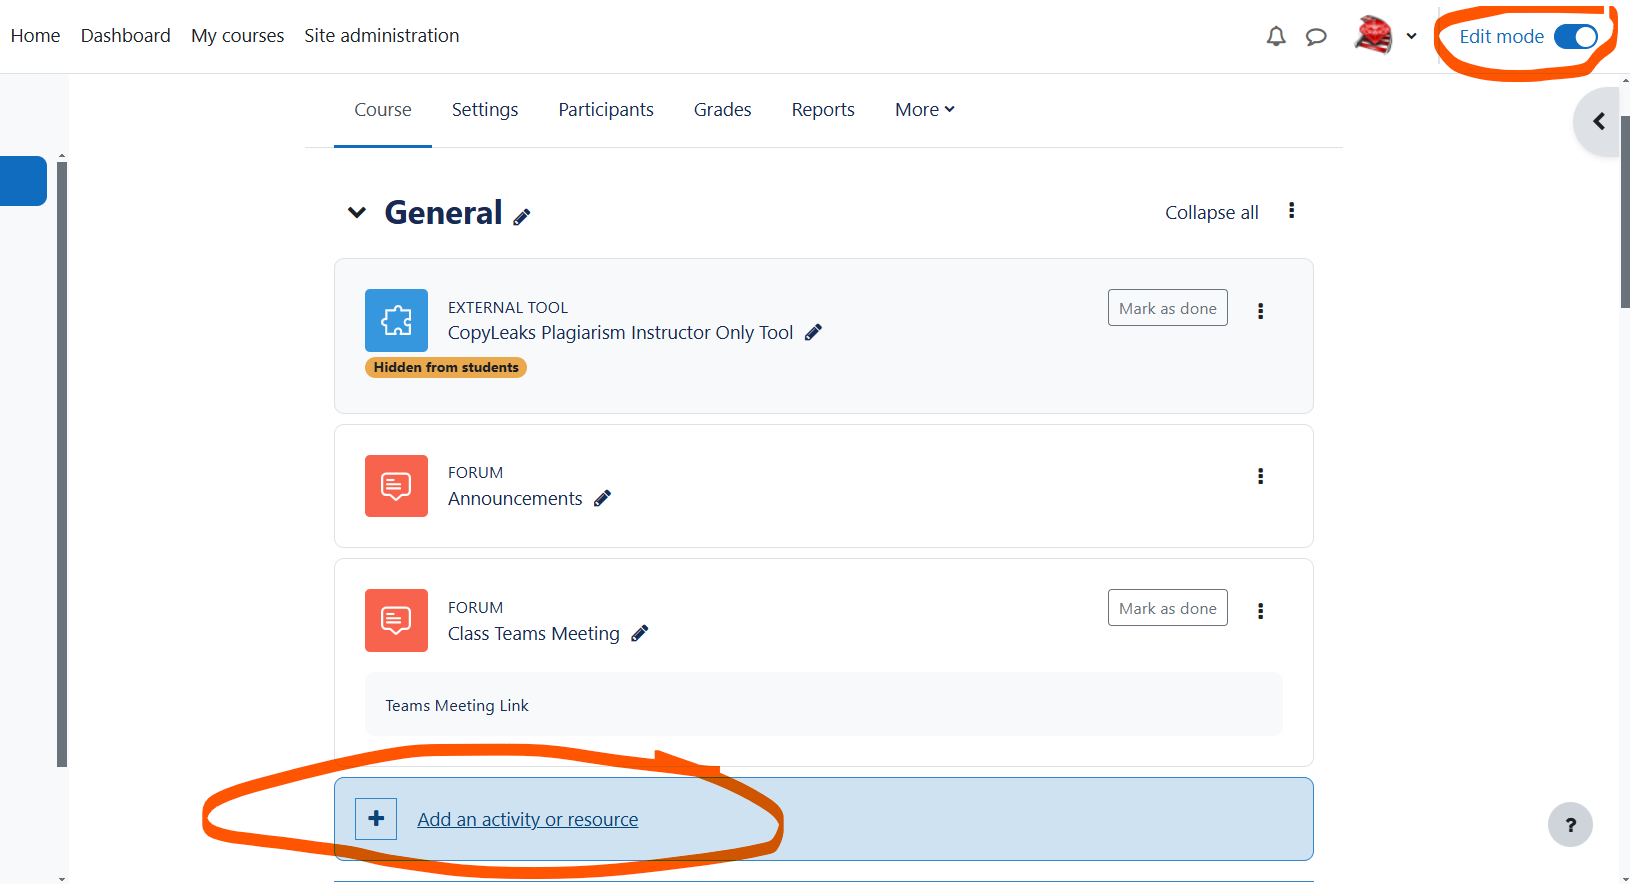
Once Edit mode is turned on at the bottom of the first section in the course choose Add an activity or resource
-
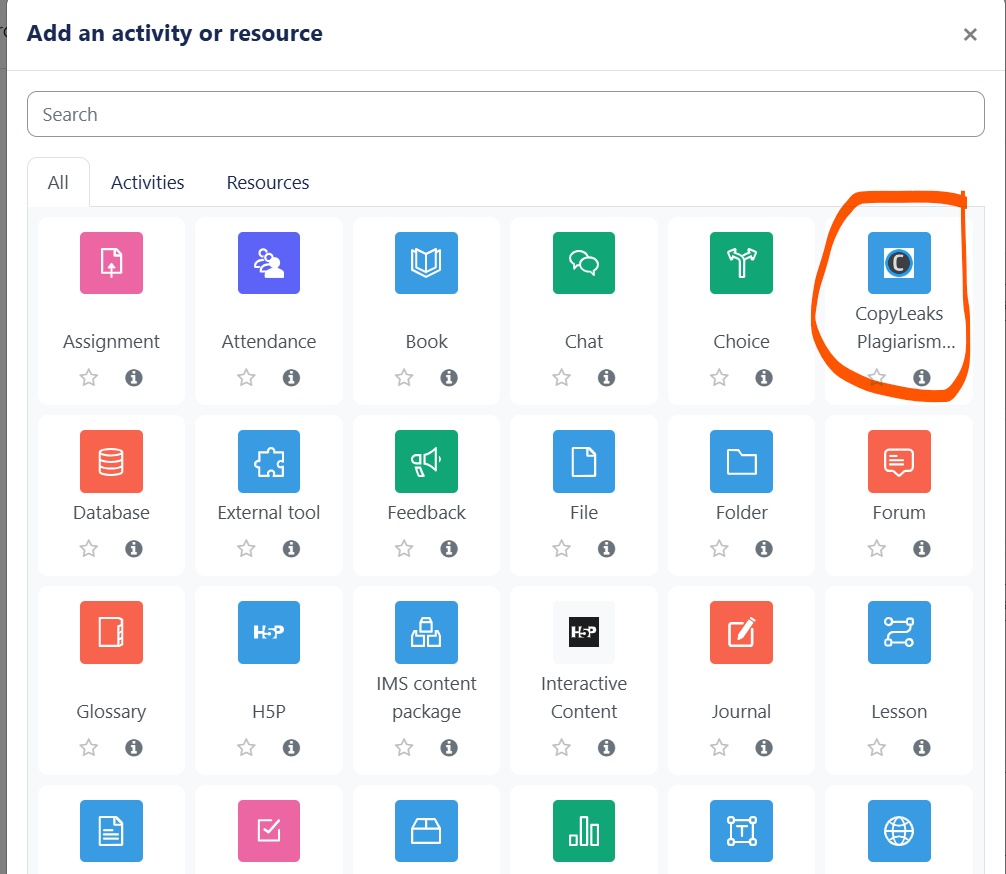
Within the Add an activity or resource window on the left side menu choose CopyLeaks Plagiarism...
-
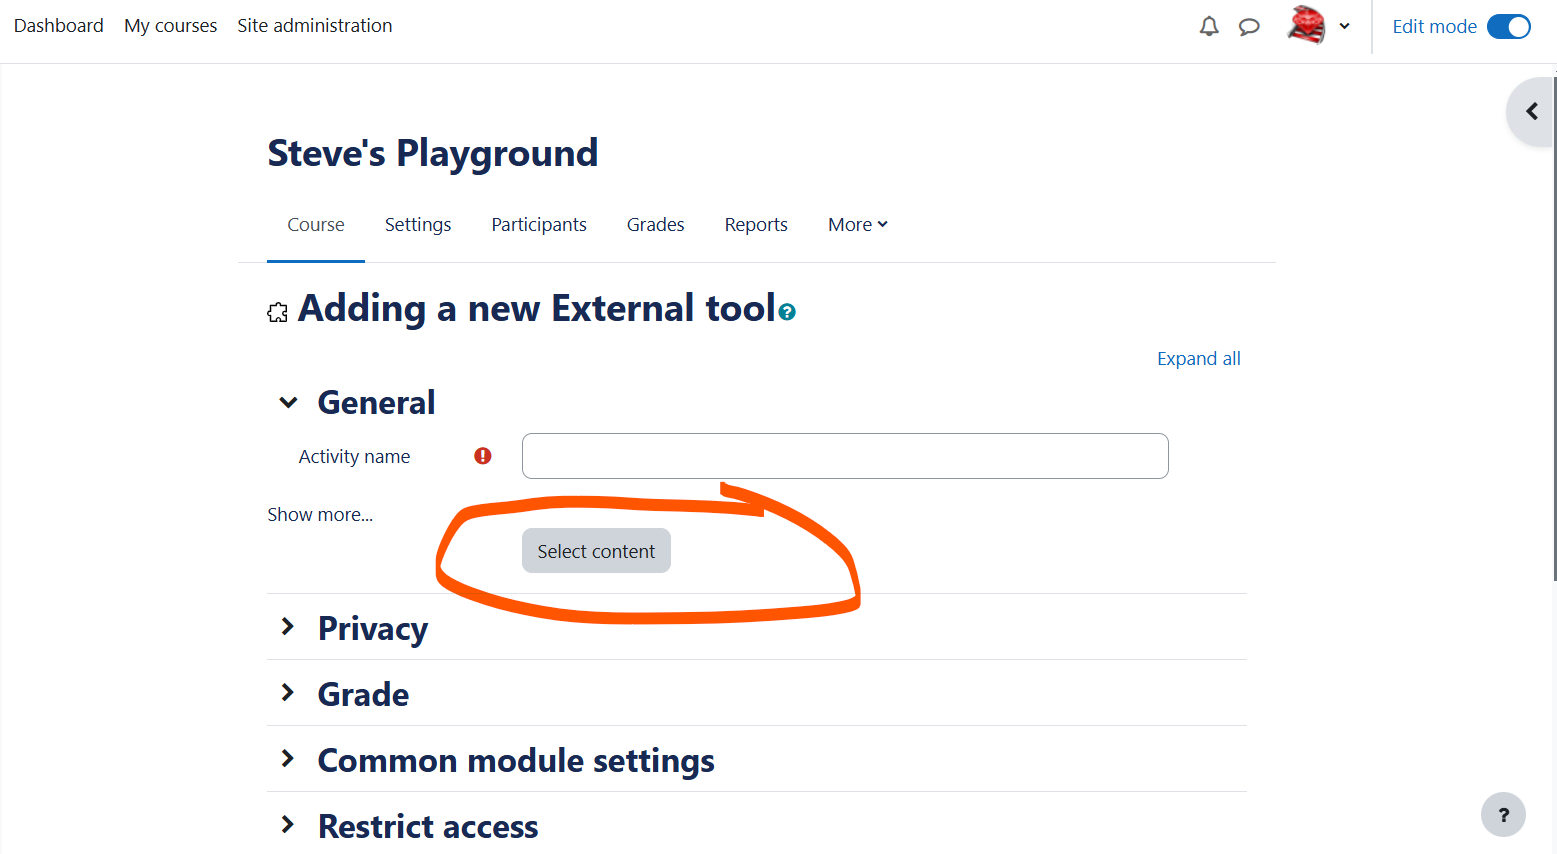
Within the Adding a new External tool window click the Select content button
-
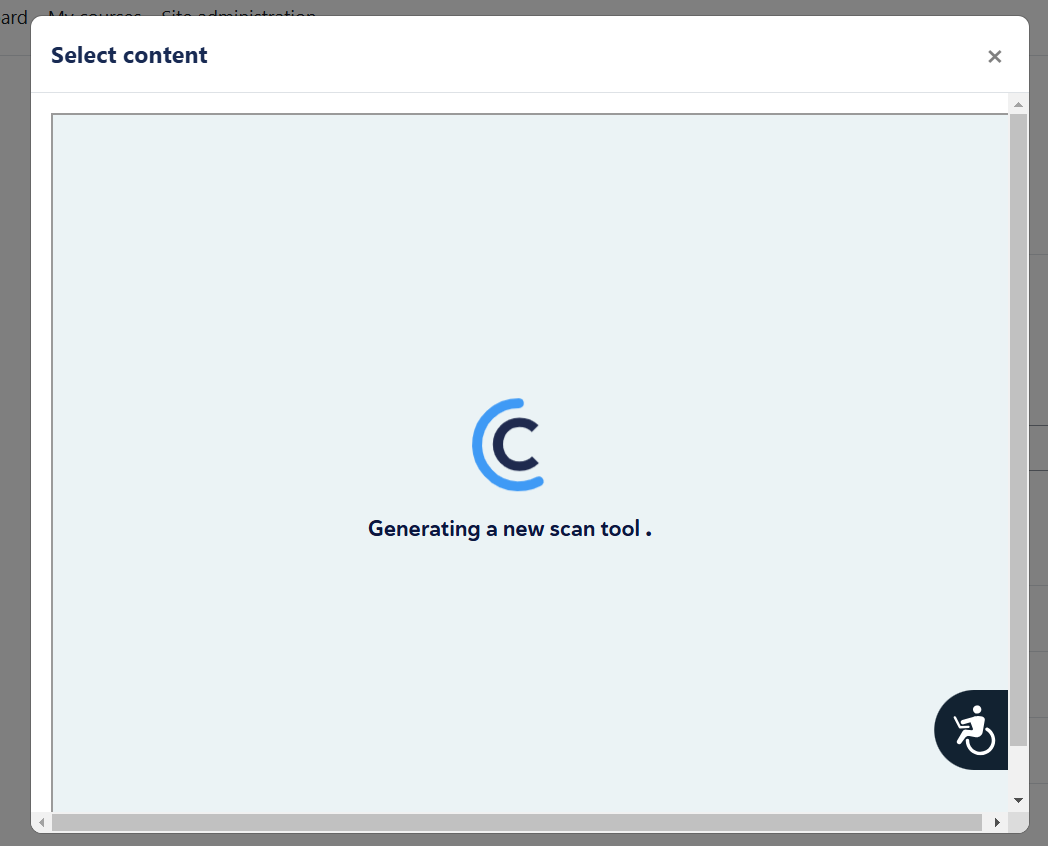
This will open a select content window. Do Nothing! just let this window spin the CopyLeaks icon until it finishes and goes away.
-
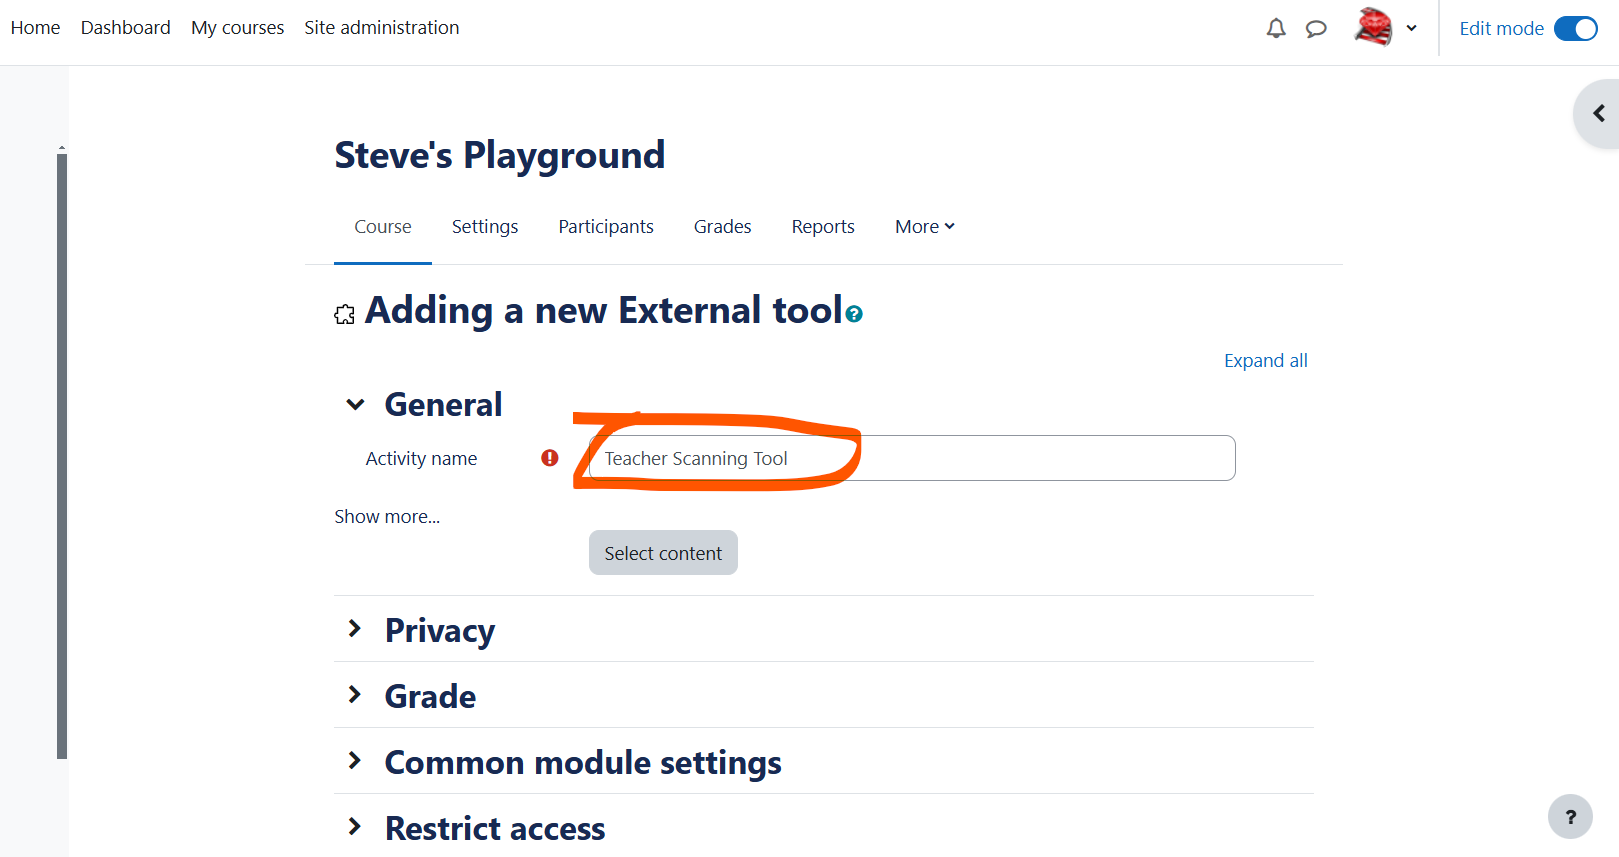
Now back on the Adding a new External tool you will see an activity name of Teacher Scanning Tool
-
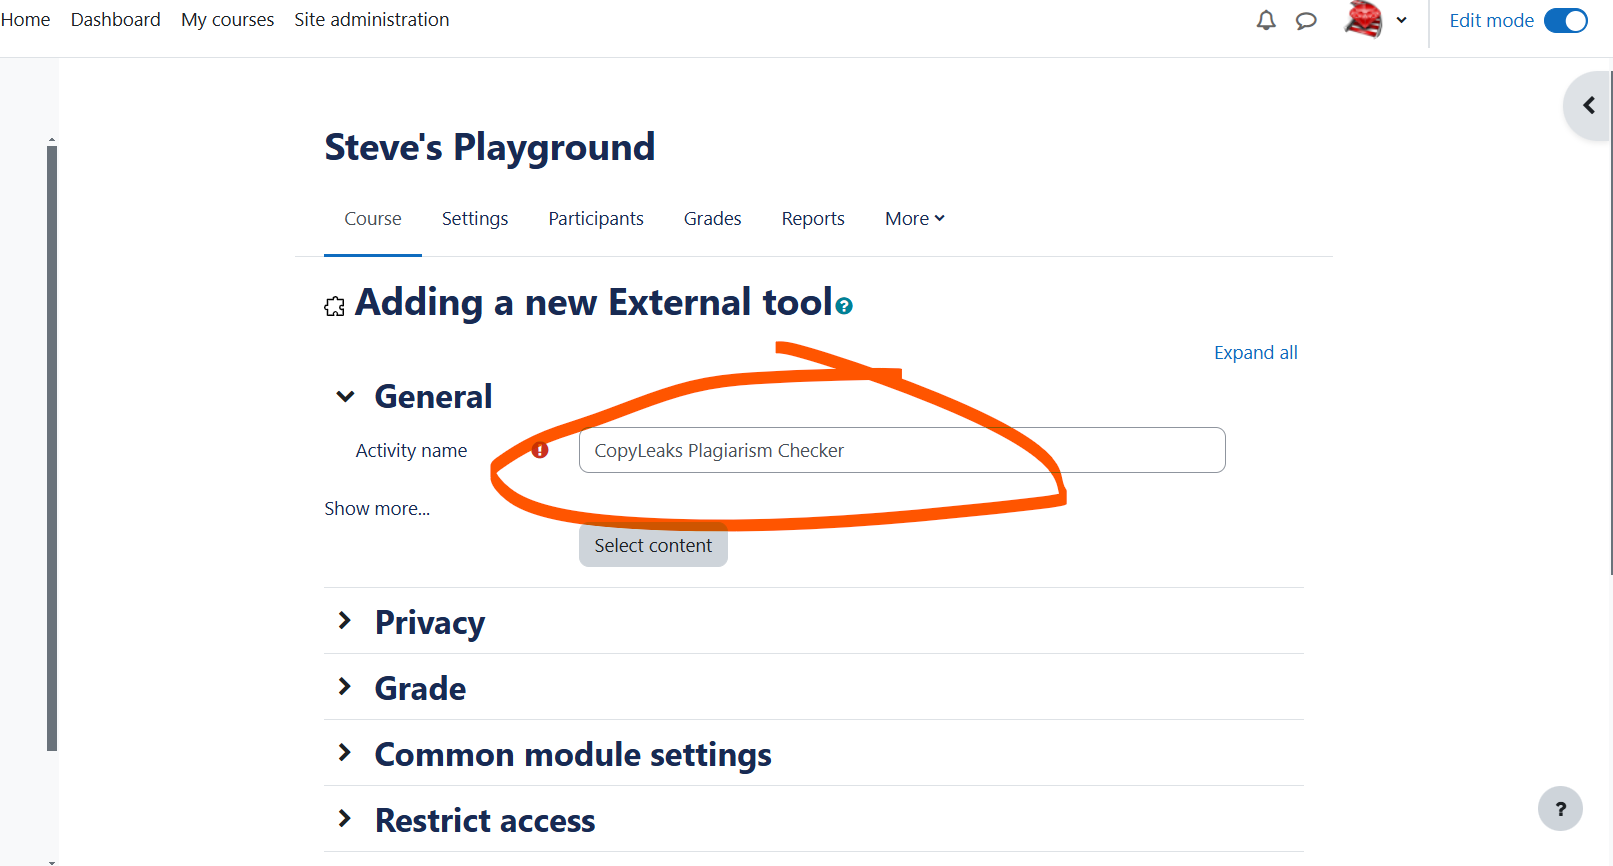
Change the activity name to CopyLeak Plagiarism Checker
-
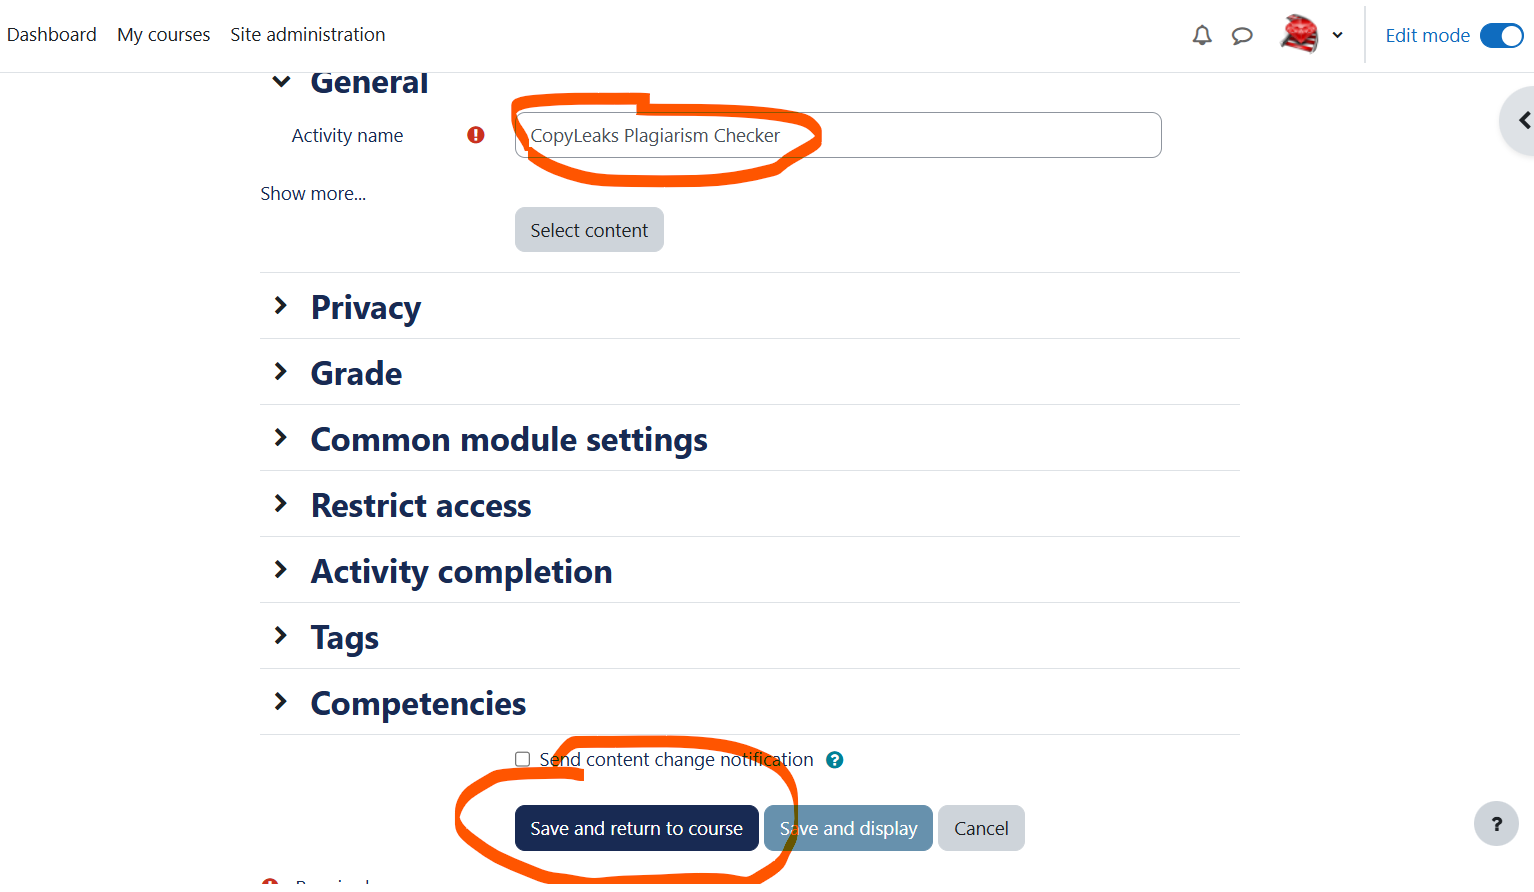
Once you have successfully changed the activity name scroll down the page and click Save and return to the course
-
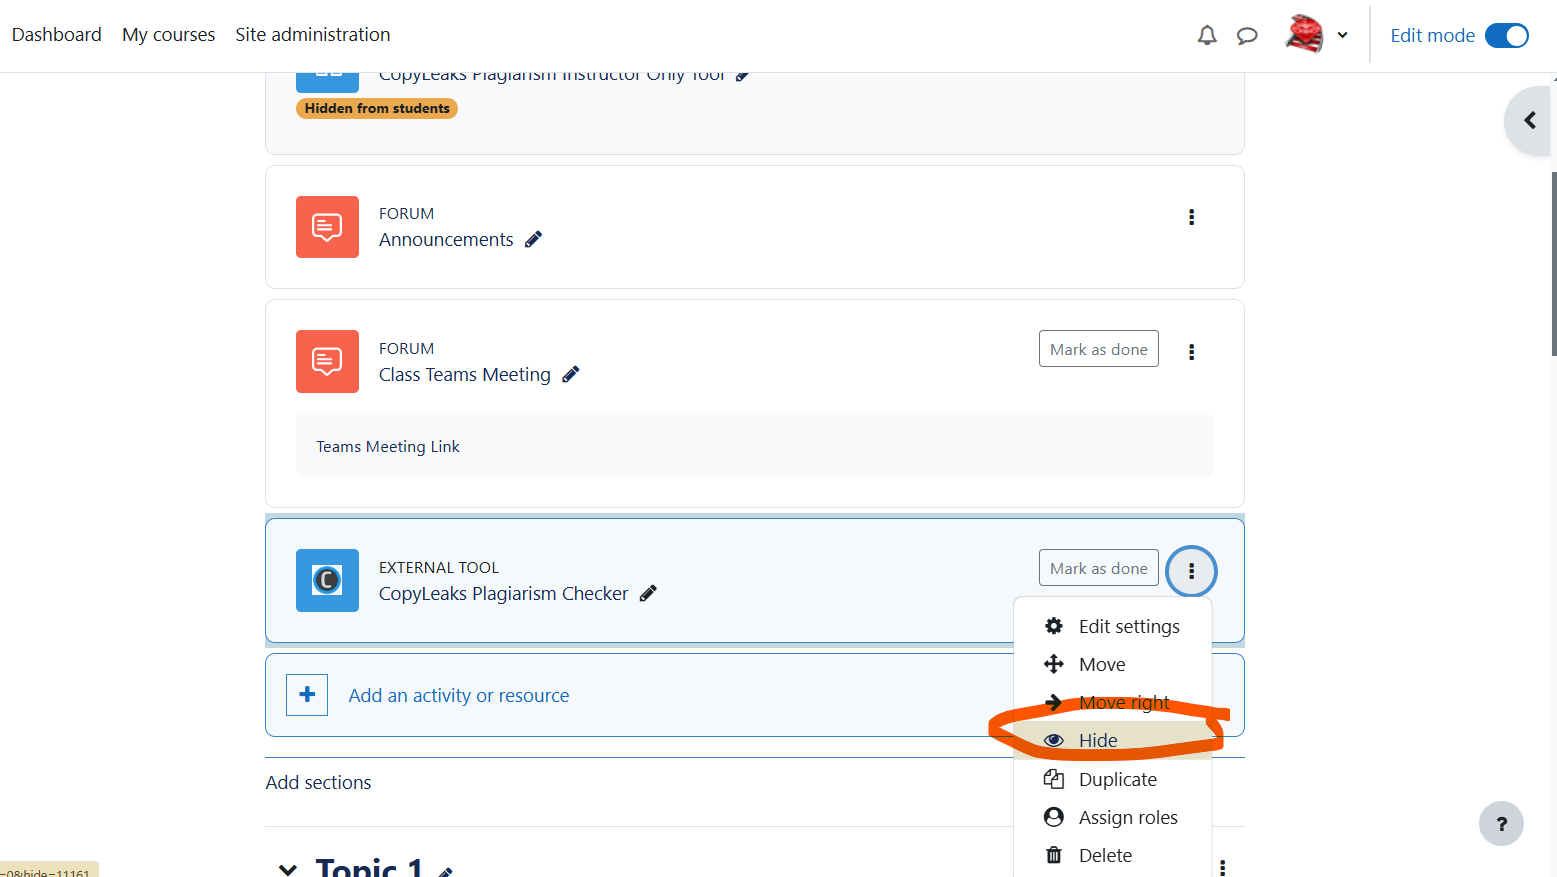
Back on the course page find the instance of your new CopyLeaks Plagiarism Checker. Select the three dot menu to the right side of the activity and choose Hide to hide this activity from students.
-
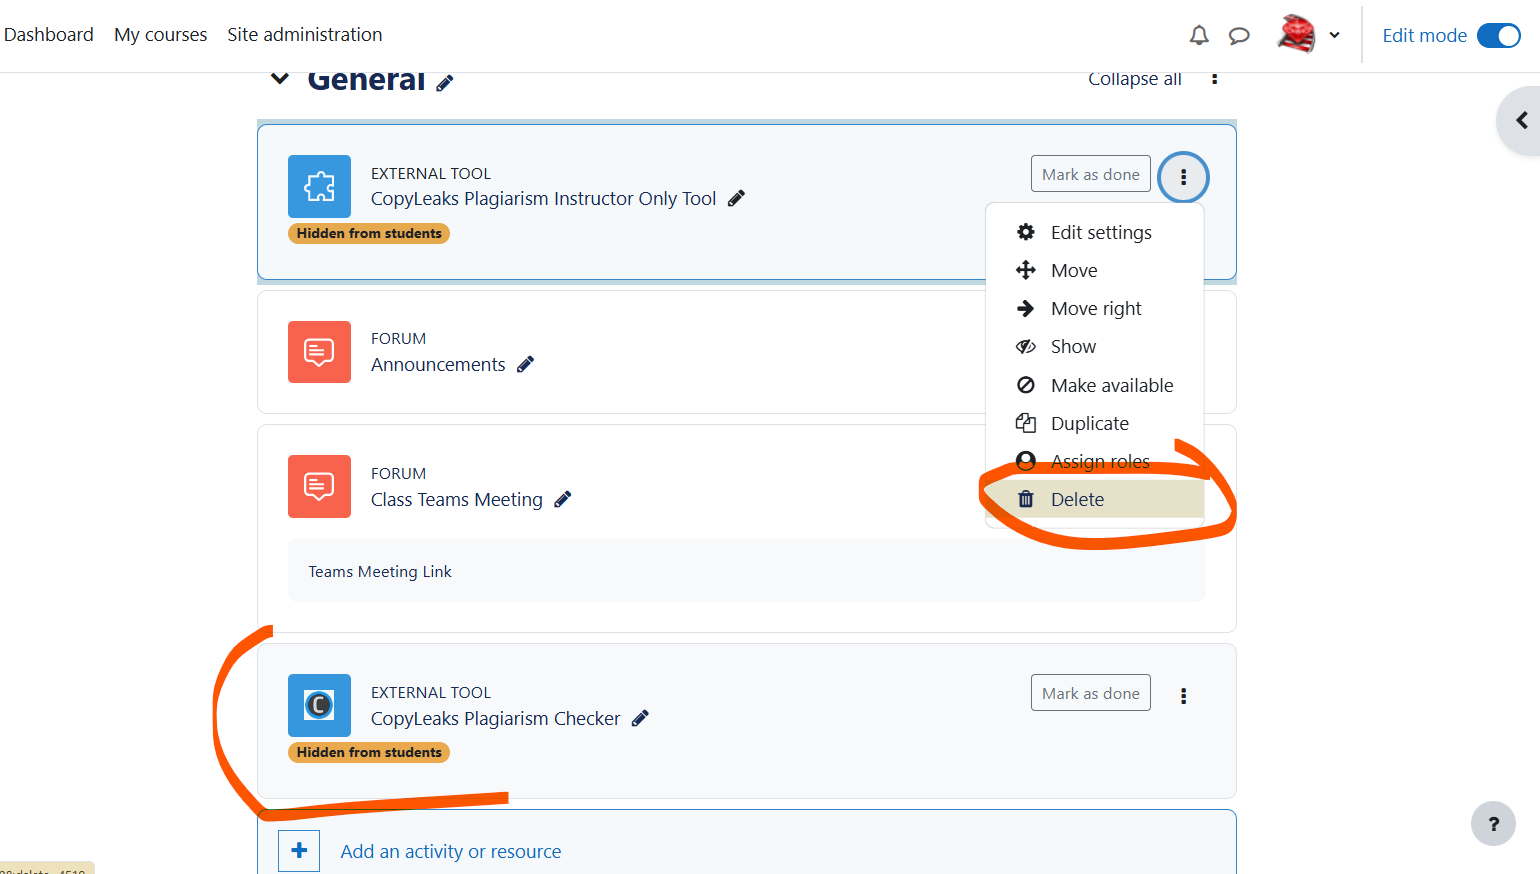
Once you have hidden your new instance of the CopyLeaks Plagiarism Checker look for any other older instances of the tool. Select the three dot menu to the right side of the old activity and choose Delete to remove the old instance form the course page
-
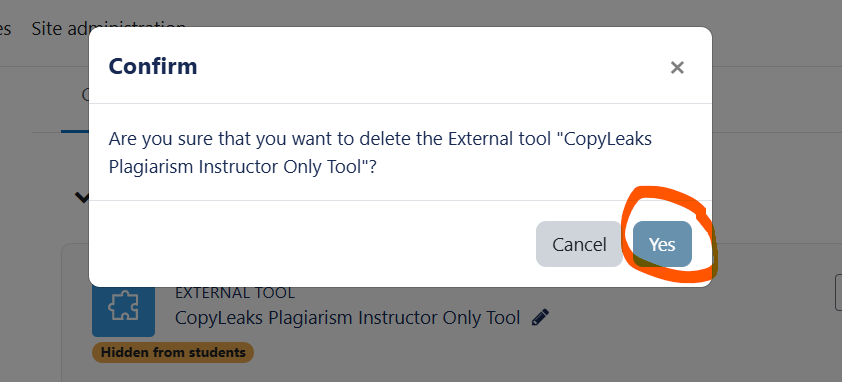
A Confirm window will appear just click Yes to go ahead and remove the old broken instance of the tool.
Disable Insights e-mail notifications in Personal Preferences
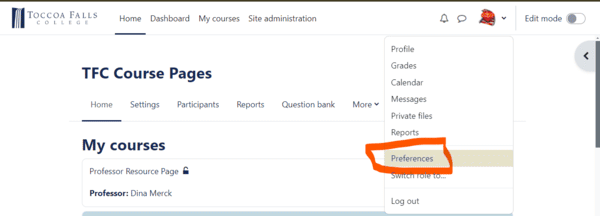
- Users can disable the notification email by themselves by going to User Profile > Preferences:
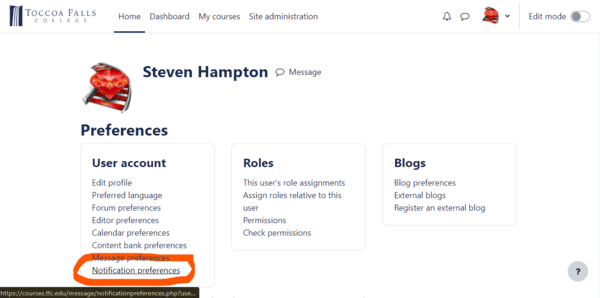
- On the Preferences page, click Notification preferences:
- On the Notification preferences page, scroll down until you find System. Under System look for Insights generated by prediction models. The right-hand slide is the email notification slide. If it is blue, slide it, and it will turn grey, thereby turning off the email notification.
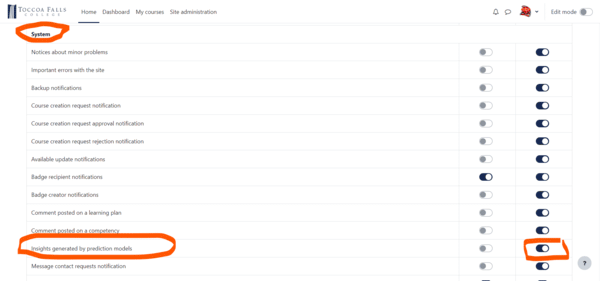
- You can now safely leave the page... However, you may wish to browse some of the other settings and make personal adjustments to your notifications. Keep in mind that the left column of the slides contains the web-based notifications that are made inside Moodle. The right side column is for email-based notifications.
Happy Moodlin!
Find the php.ini file you need.
locate php.ini | grep fpm
This will return a variety of files like the examples below:
/etc/php/7.2/apache2/php.ini
/etc/php/7.2/cli/php.ini
/etc/php/7.2/fpm/php.ini
/etc/php/7.3/apache2/php.ini
/etc/php/7.3/cli/php.ini
/etc/php/7.3/fpm/php.ini
/etc/php/7.4/apache2/php.ini
/etc/php/7.4/apache2/php.ini.ucf-dist
/etc/php/7.4/cli/php.ini
/etc/php/7.4/fpm/php.ini
/etc/php/8.0/apache2/php.ini
/etc/php/8.0/cli/php.ini
/etc/php/8.0/fpm/php.ini
Choose the specific file you will need to edit. If you are running PHP Fast Package Manager, it will be the /etc/php/X.X/fpm/php.ini file where X.X is whatever version of PHP you currently have set for the Moodle site.
sudo vim /etc/php/X.X/fpm/php.ini
use the find feature in vim (/) to look for and edit the following values with the suggested minimums:
post_max_size = 256M
upload_max_filesize = 128M
max_input_vars = 7000
memory_limit =1024M
max_execution_time =300
max_input_time = 600
Save the file and exit vim (:wq)
Restart the PHP Fast Package Manager for the specific PHP version
sudo service phpX.X-fpm restart
Restart Apache
sudo service apache2 restart
You can create an info.php file in the webroot of the site with the following contents to check and verify that your changes were successful.
<?php
phpinfo();
?>
After viewing the info.php page, change the file to prevent exposing sensitive information about your site.
mv info.php info.php.bkp
While this can be desirable for controlling page formatting and limiting the need for students to link outside the Moodle site, it can also result in cluttered pages and slow page load times. To force Moodle to display a link rather than an embedded video, modify the link to include the text "embed=no&;", as shown below.
Source link:
https://www.youtube.com/watch?v=VnuXUeEvspY
In the Moodle text editor switch to HTML editing mode (More Buttons > HTML), and place the no embed flag between "watch?" and "v=", like so:
https://www.youtube.com/watch?embed=no&;v=VnuXUeEvspY
This will force Moodle to present the linked text as text, rather than converting it to embedded video.
Drag video file into HandBrake
On the Summary tab:
--click Web Optimized
On Video Tab:
--change frame rate to "Same as Source"
--Click the radio button for Constant Frame Rate
--Set the Quality to >35 RF (usually 40)
--Under Encoder Options: set the slider to VerySlow
Click Browse in the bottom right and assign an output filename.
In the top Menu Select the Green Encode Button.
Also View the ScreenCast here to view the above instructions in action:
https://www.youtube.com/watch?v=sgmE1T8A4UY
Call Forward lets you redirect incoming calls to an alternate number. You can select one of the following forwarding options:
- Always redirects all incoming calls regardless of the state of yourtelephone.
- B–Int redirects internal calls when your telephone is busy.
- B–EXt redirects external calls when your telephone is busy.
- NA–Int redirects internal calls after several rings if you don't answer.
- NA–Ext redirects external calls after several rings if you don't answer.
Note: For information about "I'm Here?", see Call Forward – Remote.
To program Call Forward:
- Press SUPERKEY

- Press # or the No softkey until "Call Forwarding?" appears.
- Press * or the Yes softkey .
- Press # or the Next softkey until the type of Call Forward that you want to set up appears (see above).
- On a 5224 IP Phone only, press the Review softkey.
- If a number is already programmed, press * or the Change softkey.
- Press * or the Program softkey.
- Dial the destination number. If you make an error while dialing, press * or the <— softkey to correct errors.
- Press DOWN

or the Save softkey.
To turn Call Forward on and off (once it has been programmed):
- Press SUPERKEY.
- Press the No softkey until "Call Forwarding?" appears.
- Press the Yes softkey.
- Press the Next softkey until the type of Call Forward appears.
- Press the Review softkey.
- Press the Change softkey.
- Do one of the following:
- To turn Call Forward on, press the TurnOn softkey.
- To turn Call Forward off, press the TurnOff softkey
Call Forward lets you redirect incoming calls to an alternate number.
- Always redirects all incoming calls regardless of the state of your phone.
- B-Int redirects internal calls when your phone is busy, and
- B-Ext redirects external calls when your phone is busy.
- NA-Int redirects internal calls after several rings if you don't answer, and
- NA-Ext redirects external calls after several rings if you don't answer.
Note: For information about "I'm Here?", see Call Forward - Remote.
To program Call Forward:
- Press SUPERKEY.
- Press the No softkey until "Call Forwarding?" appears.
- Press the Yes softkey.
- Press the Next softkey until the type of Call Forward appears (see above).
- Press the Review softkey.
- If a number is already programmed, press the Change softkey.
- Press the Program softkey.
- Dial the destination number.
- Press the Save softkey.
To turn Call Forward on and off (once it has been programmed):
- Press SUPERKEY.
- Press the No softkey until "Call Forwarding?" appears.
- Press the Yes softkey.
- Press the Next softkey until the type of Call Forward appears.
- Press the Review softkey.
- Press the Change softkey.
- Do one of the following:
- To turn Call Forward on, press the TurnOn softkey.
- To turn Call Forward off, press the TurnOff softkey
- EqualFill – Text Expander
- Reader View -- by: yokris.dev
- uBlock Origin
